dbsh is based on IPython and it is written in python. The dbsh command is just a simple shell wrapper around python code. It uses ipython with ipy_profile_dbsh.py profile. This file should be present in your ~/.ipython/ directory. If it’s missing dbsh will fail to load. The install procedure should install it in your install area as the following:

<install_area>/lib/python2.4/site-packages/dbsh

and you can locate ipy_profile_dbsh.py over there. If you’ll experience problems just copy it over to your ~/.ipython/ area and start dbsh as ipython -p dbsh

Introduction

Basic usage (a mini tutorial)

dbsh has very simple and intuitive interface. Once you started you’ll see the following prompt

Welcome to dbsh 0.1.3!

[python 2.4.5 (#1, May 11 2008, 00:35:41) , ipython 0.8.2]

Darwin Kernel Version 9.4.0: Mon Jun  9 19:30:53 PDT 2008; root:xnu-1228.5.20~1/RELEASE_I386

For dbsh help use dbhelp, for python help use help commands

dbsh |1>

It’s ready to use! The dbsh |1> indicates a first input command prompt. Let’s explore it a little bit. First try a dbhelp command. You should see the following:

Available commands:

alter    Execute aleter SQL statement

begin    Execute begin SQL statement

close    Close connection to DB

commit   Execute commit SQL statement

connect  Invoke connection to DB

create   Execute create SQL statement

dbhelp   dbsh help

desc     Print table description

drop     Execute drop SQL statement, in particular we support drop database or drop tables <table_name>

dump     Dump content of DB

explain  Execute explain SQL statement

format   Set-up formatting output

insert   Execute insert SQL statement

migrate  Migrate content of current DB into another one

mydb     List all known (connected) DBs

rerun    Re-run command

rollback Execute rollback SQL statement

select   Execute select SQL statement

set      Execute set SQL statement

show     Show information about DB, e.g. show tables

source   Execute SQL from external file

update   Execute update SQL statement


dbsh |2>

You may noticed that your input prompt has changed to dbsh |2> to indicate that it’s ready for second command. Later we will discuss how to use your prompt to retrieve your history. In order to find out more help about dbsh commands just type dbhelp <command> at your prompt.


Finally don’t forget it’s still python and all IPython commands and syntax are fully supported, but we will talk about it later. Now it’s time to connect to your DB. For example I’ll show you how to connect to MySQL and SQLite DB back-ends. Let’s start with MySQL.

dbsh |2> connect mysql://XXX:YYY@localhost/cs330

Connecting to cs330 (mysql back-end), please wait ...

Loading 'ProjectType' table

Loading 'Projects' table

Loading 'ProjectsUsers' table

Loading 'TEST_TABLE1' table

Loading 'Users' table

mysql-cs330-localhost |3>

As you may expected at this time your input prompt has been changed. And as you noticed it’s changed in a way to show you to which DB you’re talking to. It also showed a list of tables it found and loaded for your convenience. Now you’re ready to use SQL. But before that let’s explain connect command in details. It follows a syntax introduce in SQLAlchemy package which makes a foundation for dbsh itself. It uses a driver (sqlite, oracle, mysql) to indicate DB back-end to use and the following parameters login:password@DBhost/DB. It is just general syntax which of course need to be tuned with respect to DB back-end you going to use, for example, for SQLite you’ll use sqlite:///file.db. For more example please visit appropriate section in this tutorial.


Now let’s try some execute some SQL statement

mysql-cs330-localhost |3> select * from Users;

----------------------------------------------

uid  name   login  password  email          

----------------------------------------------

1    guest  guest  guest     guest@yahoo.com

----------------------------------------------

mysql-cs330-localhost |4>

All SQL commands are supported natively in dbsh, meaning that it depends on DB back-end rather on dbsh. For example, some SQL statements are specific for one DB and will not work in another. dbsh supports also different output formats, such as HTML, XML, CSV, and you are free to experiment with them on your own using format command in dbsh.


Here we will demonstrate another feature, multiple DB connections. Let’s connect now to SQLite DB.

mysql-cs330-localhost |4> connect sqlite://test.dbConnecting to test.db (sqlite back-end), please wait ...

sqlite-test.db |5>

As you see our input prompt has been changed as expected. But wait, how about our previous connection to MySQL. It is still there!!!

sqlite-test.db |5> mydb

You are connected to the following DBs:

---------------------------------------

cs330 (mysql back-end)

test.db (sqlite back-end)

sqlite-test.db |6>

The mydb command lists all connection you made so far with dbsh and if you want to come back to MySQL just use connect command. But this time we may use our DB alias (cs330):

sqlite-test.db |6> connect cs330

Connecting to cs330 (mysql back-end), please wait ...

Loading 'ProjectType' table

Loading 'Projects' table

Loading 'ProjectsUsers' table

Loading 'TEST_TABLE1' table

Loading 'Users' table

mysql-cs330-localhost |7>

Finally I want to show how easy to migrate one DB to another. Let’s first come back to our SQLite DB and verify that no tables exists:

mysql-cs330-localhost |7> connect test.db

Connecting to test.db (sqlite back-end), please wait ...

sqlite-test.db |8> show tables


Found tables

-------------

sqlite-test.db |9>

I think you’ll find out what show tables means. Let’s explore migration process instead. Connect back to MySQL DB and invoke migrate command:

mysql-cs330-localhost |10> migrate sqlite://test.db

Connecting to test.db (sqlite back-end), please wait ...

The content of 'cs330' has been successfully migrated to 'test.db'

You may invoke connect sqlite://test.db command now.

mysql-cs330-localhost |11>

It’s very easy, isn’t it? Let’s connect to test.db and look up our User table:

mysql-cs330-localhost |12> connect sqlite://test.db

Connecting to test.db (sqlite back-end), please wait ...

Loading 'projects' table

Loading 'projectsusers' table

Loading 'projecttype' table

Loading 'test_table1' table

Loading 'users' table

sqlite-test.db |13> show tables


Found tables

-------------

projects

projectsusers

projecttype

test_table1

users

sqlite-test.db |14> select * from users;

----------------------------------------------

uid  name   login  password  email          

----------------------------------------------

1    guest  guest  guest     guest@yahoo.com

----------------------------------------------

I hope the rest would be as trivial as this migration process. Enjoy!

dbsh commands:

dbsh supports variety of useful commands. To get up-to-date list of them please use dbhelp command from dbsh prompt. Each command has separate extended help section.

Programming with dbsh:

Since dbsh based on IPython, it naturally inherit all of the functionality of IPython. In short it gives you ability to program in a shell using python. In particular dbsh add a few hooks to give you access to your query results. Let’s explore this functionality:

mysql-cs330-localhost |3> select * from testplot;

----------

id  x  y

----------

1   1  1

2   2  2

3   3  3

----------

                      <3| <dbsh.dbresults.Results object at 0x150b290>

mysql-cs330-localhost |4>

Here our first example. We select everything from testplot table. The “<3|” indicates the output from 3d command (select * from testplot). The output has been stored into Results object for your convenience. Let’s try to play with this results.

mysql-cs330-localhost |4> myresult = _3

mysql-cs330-localhost |5> print myresult

<dbsh.dbresults.Results object at 0x150b290>

mysql-cs330-localhost |6> print myresult.query

select * from testplot

mysql-cs330-localhost |7> print myresult.titles

[u'id', u'x', u'y']

mysql-cs330-localhost |8> print myresult.values

[[1L, 1L, 1L], [2L, 2L, 2L], [3L, 3L, 3L]]

The 4th input “|4>” shows how to catch results. Just use “_3” where number represents the output id, remember “<3|” and you assign myresult to be Results object. The Result object provide three attributes: query, titltes and values of the columns in a standard python list.

mysql-cs330-localhost |10> for v in myresult.values:

                     dbsh>     print v

[1L, 1L, 1L]

[2L, 2L, 2L]

[3L, 3L, 3L]

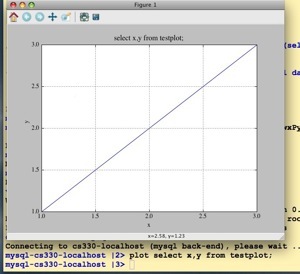
As you can see we can easily loop over our results. For more information about using interactive shell programming please consult IPython documentation. Here I’ll only show you one more interesting thing how to plot your results. dbsh added “plot” command for your convenience. Use it as prefix for any select statement to make 2D plots (more functionality will come later. So let’s do it.

mysql-cs330-localhost |11> plot select * from testplot;

/Users/vk/Work/DBProject/dbsh/src/dbsh/dbshell.py:132: DeprecationWarning: raising a string exception is deprecated

  raise "Plot support only 2-dimensional data"

First I tried to plot our previous select statement and got an exception saying it’s not supported. I cut-off output here, but thanks to IPython you’ll see full traceback, just explore it. Let’s try to plod x vs y then. Please note, that plotting functionality provided via matplotlib and it should be installed on your system


Here you see a plot of x vs y for our select query.